

Total: €0,00
Taxes and shipping calculated at checkout

The most common thing you will have to do when starting out in the lab as a student or a lab technician is prepare different solutions and stock solutions (after making sure you are wearing proper protective equipment such as your lab coat, of course - if you still need one, head to our shop).
In the laboratory, solutions are everywhere. Buffers, reaction mixtures, cell culture media, cell lysates, liquid acids, and bases are all examples of solutions commonly used in the lab.
Once you start, all kinds of work is exciting in the lab, but sometimes some tasks can become more repetitive, even though they are essential. Preparing buffers and stock solutions is one of them!
Stock solutions are concentrated versions of working solutions, which are more diluted versions of stock solutions. Naturally, you can use the prepared stock solution on its own or use it as a component in a more complex solution. You can make a batch, which can be used many times, so don’t mind me if I say stock solutions are a huge time saver!
In order to avoid their constant preparations, whenever they are needed by someone in the lab (which is VERY often!), they are made in bigger volumes/quantities. They are useful for saving space in your storage, as you can always use your higher stock solution (e.g. 10X) to make a working solution (e.g. 1X). Another big advantage is that by using stock solutions, you minimize variations between your experiments, as you are always using the same solution.
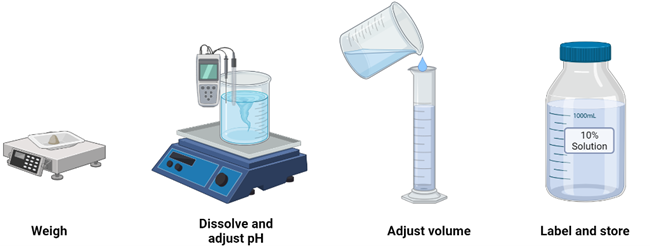
We prepared a quick step-by-step guide to make you a pro solution mixer!

Before getting your hands dirty, you will have to know how to make a dilution to get the solution with the desired concentration. The first step to making your solution is to know how much solute you need to add or weigh.
To do that you will need to use this simple equation:

By shuffling the equation around and isolating only one unknown, you can fill the others known values with numbers and find a solution! Use this equation for each component of your solution individually. The remaining difference to your final volume is the water volume you need to add at a later step.
Let’s go through this example together. For your experiment, you need to prepare 50 milliliters of a 2.5 M working solution from a 10 M stock solution.
The first thing you will want to do is calculate the volume of stock solution that is required, with the help of the formula above. Try to solve it on your own, before you take a sneak peak of the solution below 😉

ANSWER: Add 12.5 mL of 10M stock solution into a 50 mL volumetric flask and dilute it to 50 ml line with solvent. Voila, your first 2.5M working solution is done!
NOTE: Instead of using the concentration in this formula you can also molarity (M), relative concentrations (e.g. 10X, 50X,…), or any other unit. BUT only in the case they are the same on both sides! When calculating also make sure all your units are always consistent 😊
Most commonly 10X (relative concentration) stock solutions are made to avoid complicated calculations. For example, you would add 100 grams of your solute to 1000mL water to make the 10% stock solution. However, if you want to make a different percentage stock solution, then you follow the same reasoning.
Check if the scale is calibrated and if you are lucky and it is, then weigh in the components. Make sure you clean the scale before weighing. Be as accurate as possible!
Find an appropriately sized beaker and fill it up to around 80-85% of the final volume. This way you do not have to worry about exceeding the final volume when adjusting pH.
Before mixing in your precisely weighed components, drop a clean magnetic stir bar into the beaker and put it on the magnetic stirrer.
Now, you just have to wait for the components to dissolve completely. You finally can take a short break!
NOTE: Always start with less volume and then fill up later, so you do not exceed the final volume!
When the components are dissolved the pH needs to be adjusted according to the recipe. This is done by adding drops of concentrated acid or base while monitoring the pH change through the pH meter. Be patient and add in small amounts, the pH changes quickly!
This step is mostly done when preparing buffers, and not when making simple stock solutions.
Just a bit more, this is almost the last step. You are almost there!
Once the pH is set you have to fill up to the final volume. For this, you will need to use a graduated cylinder as it is more accurate.
PRO TIP: To avoid the magnetic stir bar falling out of the beaker when pouring the solution into a graduated cylinder and potentially making a splash or breaking something, hold a bigger magnetic stir bar on the outside of the beaker to hold it in place!
Accurately label the prepared solution with its name, molarity, and the date of preparation and expiry. Afterward, store it in the designated place, so everyone can find it and access it at any time.
To wrap it up, write everything neatly in the laboratory journal. This way everything is well documented and everyone can check what a good job you did.
PS.: Apart from sticking to a good protocol, it is also essential to be sufficiently protected - make sure you have good protective equipment!


