

Total: €0,00
Taxes and shipping calculated at checkout

Polymerase chain reaction (PCR) is a common laboratory method used in almost every biological laboratory. With this method, you can amplify small amounts of genetic material and use it for the detection of viruses, genetic variations or for genetic manipulation. It is no wonder why it is so widely used, as you can see it is very versatile!
For all the need-to-know information you can have a look at the PCR blog post, with all the essentials summed up.
In order for the PCR to work, correctly designing primers is essential!
PCR is not the only laboratory technique that needs primer applications. Primers are also needed in PCR variations (such as qPCR, RT-PCR), DNA sequencing and hybridization.
So learning how to design primers will come in handy sooner or later.
Primers are short, single-stranded nucleic acid sequences used as a starting point for DNA synthesis. Primer sequences provide a free 3’ OH end, which serves as a foundation for DNA polymerase activity. DNA polymerases are enzymes, which synthesize DNA.
However, they cannot start from scratch, but can only add nucleotides to already existing strand of nucleotides. In cells, primers are provided by an enzyme called primase. Primase lays short strands of RNA as the foundation for DNA replication.
However, in the laboratory, PCR is not performed in cells, therefore this mechanism is not available. That is why primers are needed in the laboratory in order to achieve DNA amplification.
In order to multiply the desired target gene region primers need to be complementary to the template region of DNA. This increases the accuracy of the DNA elongation.
In PCR 2 types of primers are used, namely forward and reverse primers. They ideally have the same length and do not have sequences complementary to each other.
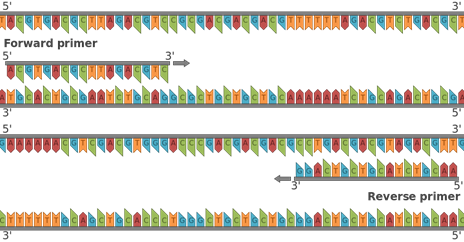
5’primers refer to forward primers and 3’primers are reverse primers. This means that the forward primer anneals to the antisense strand of DNA ( 3’ end -> 5’end), whereas reverse primer anneals to the sense strand of DNA ( 5’end -> 3’end). Both primers, forward and reverse, must have a free 3’ end and they need to be pointed towards each other, as seen in the picture below.

The main purpose of using primers is to aid in the DNA synthesis process and copying DNA. Primers provide a free 3’ OH end, where a polymerase can bind and continue building a new strand complementary to the template strand.
Defining what your desired experimental outcome is, is crucial for primer design, as parameters such as the PCR product length and the locations of the primers largely depend on it. The purpose of the planned experiments can be amplifying the whole gene, measuring expression levels or checking for the presence of the target gene,..
Properly designed primers reduce costs and time associated with experimental error and having to re-do your experiment. So rather spend more time on careful primer design, than having to do the whole experiment again.
When designing primers for your gene of interest (GOI) you need to consider many factors. Here are some important considerations and tips for a successful primer design that leads to specific amplification with high yield:
When considering the length of the primer, it should be short enough for primers to bind easily at the annealing temperature and long enough for sufficient specificity. Thus, optimal primer length is generally considered to be in the range between 18 – 30 nucleotides.
Primer melting temperature is defined as the temperature at which half of the DNA duplex will dissociate and become single stranded. It is used as the indicator of the DNA duplex stability.
Tm of the primers with best results should be between 52 °C – 58 °C. Primer pairs should have melting temperature within 5°C of each other. A bigger temperature mismatch can lead to no amplification of the primers. With increasing Tm the probability for secondary annealing of primers increases, predominantly when the Tm exceeds 65 °C .
You can estimate the designed primer Tm, by using many online calculators or use the following formula for a rough estimation:

This means to add up the respective number of bases in the primer, with adding up 4 °C for every G or C base in a primer and for every A or T base in a primer adding up 2 °C.
Primer annealing temperature is the temperature at which the primer will bind, through hydrogen bonds, to the complementary DNA template.
The optimal annealing temperature is 5°C below the Tm in order for most of the primers to bind to the templates. If the temperature is lowered more than 5°C it could lead to more non-specific binding, caused by base-pair mismatches.
The total percentage of G and C bases of the primer should be between 40-60%.
Design the 3’ primer ending with 2 to 3 C or G nucleotides to promote binding. Since G and C base pairs have 3 bonds, they promote stronger and more specific binding of the primer. But do not exaggerate, if there is more than 3 G or C bases at the last 5 bases it promotes too tight binding of the primer.

If you want to insert a restriction site, do so on the 5’end of the primer with overhangs. Typically, adding 3 to 4 nucleotides to allow for efficient cutting, is sufficient.
Below mentioned situations can lead to poor annealing, mispriming to unintended locations in the DNA and low or no PCR product yield. Thus they should be avoided when designing a primer.
Intra-primer homology leads to intramolecular interaction, meaning more than 3 bases are complementary within the primer itself. This leads to the formation of hairpins, resulting in a reduced availability of primers in the PCR reaction.
Inter-primer homology is referred to when forward and reverse primers have complementary sequences. When two sense primers are complementary it leads to the formation of self-dimers, whereas complementary interaction between sense and antisense primers leads to the formation of cross dimers.

Regions of homology should be avoided to increase primer specificity, in order to avoid amplification of non-target gene regions. Commonly, primers are designed and then put in an online tool called BLAST to test the specificity. However, there are many tools online that check for regions of homology already while designing the primers.
After the PCR run has finished you need to check if it was successful. The efficiency ad specificity of the PCR reaction is tested by gel electrophoresis, a technique where DNA fragments are separated on the gel by electric current based on size.
If the PCR reaction worked you should see a band, that represents the amplified PCR product on the gel.
However, sometimes things can go wrong and your PCR product is nowhere to be seen on the gel. What now?
If you have designed primers carefully and passed all the checkmarks and your PCR product is not showing up, then try changing the conditions of the PCR reaction (annealing or melting temperatures, reaction times) or increasing the concentration of the template DNA in your sample.
Playing around with primer design and PCR is fun. Nowadays, there are several tools for designing specific primers, such as Primer-BLAST, Primer Premier 5.0 and many others. Once you design your primers you can simply send them off to be synthesized and you can start your experiment soon!
Hopefully, these tips are helpful on your journey to learn PCR basics and give you confidence in the lab!


